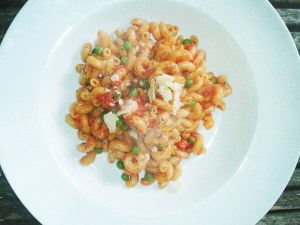
Classic Garlic Mushrooms

Recipe category flag logostapas

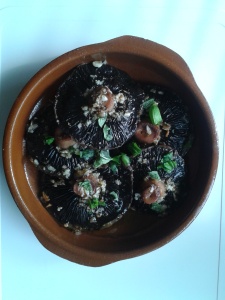
Someone at the restaurant said to me the other day; “you don’t have many vegetarian options – can you do something for me?” well, I always love a challenge, and quite enjoy going ‘off menu’ when time allows and surprising a diner with something interesting and tasteful – but due to the huge variants of peoples’ tastebuds, it’s not always a sure fire winner – occasionally therefore, this means going for something more obvious and classic, (but utterly delicious) and although strictly speaking French in origin, as we come into autumn the heady aroma of mushrooms, butter, garlic and freshly torn, fragrant parsley is a fabulous addition to a Tapas selection. The combination of the meaty texture of mushroom (you can use a mixture of your favourites if you wish; allow around 250g per person) alongside garlic butter is one that was made in nature – wild garlic, mushrooms, parsley and cows… it would be rude not to, wouldn’t it?

Ingredients (serves 4)

8 Portobello mushrooms, or a selection of good sized wild mushrooms – allow around 250g per person

5 garlic cloves, crushed and very finely chopped

Olive oil for drizzling

Pinch of chilli flakes

Fistful of fresh flat leaf parsley, torn by hand

300g Salted butter at room temperature

Splash of white wine (optional)

Salt and black pepper to taste

Let’s cook – Firstly, preheat the oven to 200c give the mushrooms a wipe with a clean, dry cloth or kitchen paper to remove any loose dirt – don’t wash them; they will act like sponges and will end up soggy and waterlogged – not good!

Like most tapas dishes, this is fast and simple to prepare – just put the butter, garlic, chilli and seasoning into a bowl and mix together – go easier on the salt as you could overdo this when using salted butter – spread a little of the mixture over the cap of each mushroom to stop it stcking to your dish and then spoon liberally over the bases. place 2 mushrooms cap side down into 4 ovenproof dishes, drizzle with a little olive oil and the white wine if using, sprinkle with a little black pepper and bake for 15 mins.

2013-06-28 17.54.26 2013-06-28 17.54.37

Sprinkle liberally with the parsley and serve with torn pieces of warmed, just toasted bread and a vibrant white  such as a white Rioja from Bodegas Franco-Españolas Diamante, made with macabeo and malvasía viura grapes – get it here.

Watch out for more tapas soon – I will be creating a series over the next few weeks in a desperate attempt to forget that summer here in the UK has nearly ended – Viva Sol España!


Paprika Chicken

Recipe category flag hungary2


Let’s get at least one thing straight here – tasty though it is, Hungary has more to give the world of food than Goulash (proper recipe to follow shortly) and I have always wanted to include  some Hungarian dishes here among the humble pages of europa-café, so let’s start with a little food history; being the proud owner of Europes largest lake, lake Balaton, you would expect some pretty special freshwater fish dishes – and they do exist most definitely – from goose liver stuffed trout, lots of carp and crumbed pike perch not forgetting the unusual sheat-fish; similar to a catfish – some of them are huge – up to 2m is common – you’ll need a really big barbeque for that! On a culinary level, Hungary has a reputation for adding sour cream and of course, paprika to everything and dishes with an over use of heavy fats –  a bit unfair, as many dishes are light, salad based and extremely tasteful – especially during these days of healthier oils and fresh produce of which there are plenty. More to the point, they sit well here on europa as they all make the very best of the ingredients produced by the country – and many of the simpler recipes date back as far as the 9th century – unreliant on garlic or strong spices, many dishes are just able to shout out from the plate with the actual flavours of the ingredients coming through wonderfully. As for the wine, I have to say the country produces some of my favourite european wines too, born from the deeply cultivated vines and rich soils they thrive in. Obviously there are influences from Serbia, Croatia and even Italy has a finger in the pie; there are many pasta based recipes too, the most popular being the egg based pasta ‘Tarhonya’  which is chopped into very small barley sized pieces from a long thin roll, or grated from a larger ball of pasta dough – a fabulous accompaniment to our chicken here if cooked in salted water and tossed in butter-fried onions with a handful of chopped gherkins stirred in. Alternatively, serve with new potatoes – yes, go on and add a sour cream and chive dollop – where’s the harm?

At the restaurant, I do an emergency vegetarian dish based around a stroganoff which includes brandy flambéed mushrooms, red peppers and red onions in a cream and paprika sauce, finished with a little chilli and some fresh flat leaf parsley. I have yet to see someone not return the plate absolutely clear – licked clean in one case – yes, I know, but what a compliment!

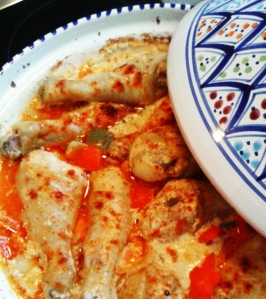
The paprika chicken isn’t far from that dish flavour wise, and it’s very simple. Use thighs, quarters, drumsticks or which ever cut you prefer – just remember that the larger the portions, the longer the cooking time. I used drumsticks on this occasion, and they were falling off the bone beautifully – I served it with warm crusty bread and sautéed potatoes. Needless to say, no-one went Hungary…

Ingredients (serves 4)

8 Chicken drumsticks, skin on

1 dsp paprika

300 ml white or rosé wine

300ml double cream

1 onion, chopped

2 red, 1 green pepper

1 tbsp tomato purée or 1 large tomato, chopped

Salt/pepper, general use

Sunflower oil, gen use

Let’s cook – get the oven on to 200°c, and heat some oil (2-3 tbsps) in a large sauté pan – add the onions and cook until starting to change colour and soften. Next, add the chicken to the pan and brown the portions on all sides, add the paprika, tomato/purée, season with salt and pepper then turn to coat the chicken in the beautiful orangey oil – remove from the heat and transfer to an ovenproof casserole pot with a lid or tagine, pour over the wine, add the peppers, cover and cook for around 30-40 minutes, until the chicken is cooked thoroughly.

2014-06-03 17.04.03

Serve with sautéed potatoes or Tarhonya dressed with butter and fried onions – garnish with slices of gherkins and don’t forget some warmed crusty bread to sink into the sauce. Seriously addictive!

When cooked, remove the chicken portions from the pot for a few moments while you add the cream to the hot juices in the pot – stir through, then return the chicken to the pot and serve.


Chicken Tagine with vegetable couscous

Recipe category flag logos

Whether you actually own a Tagine or not, it’s great to know that the authentic flavours of Morocco can be re-created at home – I guess we should all count ourselves lucky that we can get hold of some really good ingredients these days – I have recently been reading ‘A book of Mediterranean Food’ by Elisabeth David, and the sheer number of references to ‘hard to find’ authentic spices or produce is astounding by today’s standards – she truly was a forward thinking cook, and if you haven’t already, then track down a copy of the book. It will open your eyes in so many ways.

From a foodie point of view, and by the very nature of easy to get ingredients, it’s all too easy to go overboard with spices, seasonings and flavours and to that end, a culinary trip to Morocco is a leveller – cook a few dishes and revel in the subtle character of its spice, and the way the flavours of the ingredients, not just the spices contained in the dish, sing alongside. That’s not to say there aren’t some hot, richly spiced offerings; quite the opposite, but the addition of Cumin alone for example, is not the way forward.  To cook in an authentic way you need to embrace the base spice ingredients; the staple ones, without which the dish would be bland and could be from anywhere in the world. For Morocco, these would include Cumin, Cinnamon, Black Pepper, Turmeric, Pimenton, Coriander (seeds/ground), fennel seeds and lots more but these are pretty much the key ones. North Africa takes great pride in its food, and like many of the countries kissing the Mediterranean coast, makes the very best use of locally sourced ingredients – the food? Simple and beautifully delicious. The staple addition of olives, lemons, (preserved and fresh) dates, cardamons and fruits like apricots and tomatoes (usually sun dried) to many dishes are commonplace and are therefore used to maximum effect wherever they appear.

Unlike many cultures that rely on modern appliances, the food of Morocco has grown up around its own; there are a lot of open fires upon which to cook and many one-pot meals or breads are fired in underground community ovens, this all makes perfect sense, let alone a fabulous lunch! Even a lot of the street food in Marrakech is cooked over open flames – not much chance that any of the large fast food chains could even contemplate, let alone work around page after page of health and safety garbage and reams of risk assessments or even simply compete – thank goodness for that.

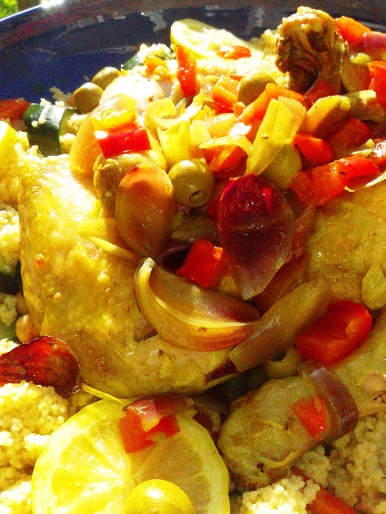
2014-05-06 18.06.22

Serves 4…

4 fresh chicken quarters (or 8 thighs)

2 lots of chicken stock 500ml each

Olive oil, general use

3 Red onions, halved then quartered (to give 8 pieces from each onion)

1 large pepper, chopped

3 Garlic cloves, crushed

Ground turmeric, cumin, ginger, cinnamon, coriander – half tsp of each

1 large unwaxed lemon, sliced

For the couscous:

1 Courgette, halved lengthways and chopped

Good handful of olives

500g Couscous

1 large carrot, halved lengthways then sliced

250g tinned chickpeas, drained

Sea salt, black pepper

Let’s cook – get the oven on to around 180°c –  then heat some olive oil (around 50ml) in an ovenproof casserole pan, then brown the chicken portions – one at a time is best, set them aside when done, then reduce the heat and add the onions and the garlic, stir through the spices and combine to form a paste. Return the chicken to the pan and turn to ensure that each piece is coated well. Pour the first 500ml of chicken stock over, add the lemons and the peppers, season well with salt and pepper, cover with a lid and transfer to the oven for 45 minutes, remove the lid for the the last 10-15 minutes if you want to thicken the sauce slightly, or you can remove the chicken pieces and heat through in a saucepan on the hob if you wish – personally, I favour taking the lid off in the oven as it browns the meat slightly more too.

Whilst all this is going on, around half way through the cooking time, prepare the couscous, without which, no Moroccan meal would be complete! This will take a total of around 20 minutes.

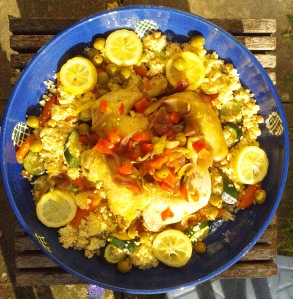
2014-05-06 18.06.10

A wonderfully simple dish to share with friends, family or have the lot to yourself if you like…

Heat your stock in a saucepan, and when almost boiling, add the carrots and cook for 5 minutes, then add your vegetables, cover and simmer for a few more minutes – around 5-7 should be enough on a medium heat – there’s no need to season as the stock should have enough to give it a kick then add the couscous and stir with a fork, leave for a minute or two and stir again, ready to serve into a huge bowl, with the chicken dished out on top for your guests to dip into.

Top off with some fresh coriander leaves (I forgot! – that’s why there’s none in the pictures..)

To drink? Well, it simply has to be Mint tea! ( make a 1 litre pot of green tea, with at least 3 bags/dsps, a shed load (4 dsps) of sugar ( and a very generous sprig or six of fresh mint leaves – let it infuse for 4 or 5 minutes and then pour or strain into heat proof shot glasses or espresso cups.

A genuine taste of North Africa! Enjoy.

Spaghetti Amatriciana

Recipe category flag logos_5

Amatrice is a city about half way up the long part of Italy, north west of Rome and almost central with a bias to the Adriatic side of the country – handy access to both the Mediterranean coast, via Rome if the mood takes you, and the Adriatic is also handy should you prefer. The semi-famous sign as you enter the city reads proudly: “Cittá Degli Spaghetti All’ Amatriciana”. No wonder then, that the recipe would appear here on europa café – it ticks all the boxes with easy going ingredients, classic Italian heritage and of course, it’s downright delicious, too.

You can go all out and buy plum tomatoes, premium Pancetta, and it will be utterly wonderful; but before you hit the market with every euro/pound you own, it’s worth remembering that back in the day, it was constructed with peasant fayre – things like Pancetta, with its streaky layers of fat weren’t available, let alone fashionable, so it used to be made traditionally with pork cheek – yesterdays throw-away, today’s delicacy! To that end, I managed to get all the ingredients for 4 portions, with spares left over for next to nothing, (spaghetti 26p, chillis 49p, garlic bulb 50p, onions 69p, fresh tomatoes £1.05, canned tomatoes 31p and smoked streaky bacon £1.63 – total £4.93 ) and the simple dish ensued – so have a go at my take on one of the quickest, most tasteful and simple pasta dishes to have ever been devised…now that’s really handy.

Ingredients:

500g Spaghetti

400g Canned tomatoes

400g Fresh tomatoes, quartered

350-400g Streaky smoked bacon, chopped

4 Cloves garlic, crushed and finely chopped

2 fresh green chillies, sliced finely

2 Onions, halved and sliced

Olive oil, salt and black pepper for general use

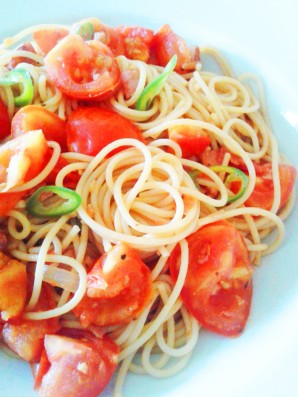
Let’s cook – Firstly put a large pan of generously salted water (1 to 1.5 litres should be enough) on to boil over a high heat; then heat some oil in a sauté pan to medium heat and add the bacon – when it starts to colour, add the onions and the garlic and cook for 3 or 4 minutes. Add the fresh tomatoes and the chillies, and when the tomatoes start to soften, pour in the canned tomatoes and stir through. Season just with black pepper (should be salty enough from the bacon, but have a taste once the bacon is cooked and add some salt if you wish) decrease the heat and simmer to reduce the liquid, stirring occasionally.


Belissima - You have to admire the simplicity of Amatriciana - great value, max flavour

If you prefer, you can make this saucier if you wish, just reserve a little of the drained spaghetti water, and add a couple of teaspoons of tomato paste/purée. Stir through when you add the canned tomatoes.


By now the water in the spaghetti pan should be boiling. If so, add the spaghetti, reduce the heat to around 75% and  simmer, stirring with a fork regularly for around 8-10 minutes until al dente.

Drain the pasta and combine with the contents of the other pan, serve immediately with some freshly ground black pepper – you can sprinkle some cheese and some chopped parsley or basil if you prefer, both work exceptionally well.

Told you it was easy!

Throw in some Ciabatta bread and an oaky Italian red from the central part of Italy such as a Sangiovese into the equation and you won’t fail to be satisfied…yum.

2014-04-29 16.56.07


Pollo De Madrid

Spanish europa cuisine flagApart from being an everyday staple of the Spanish table, picnic basket and those cheesecloth wraps on the end of a stick, Chorizo is a genius piece of food engineering – which sums up, in every smoky mouthful, pretty much everything I stand for when it comes to food; okay that’s a pretty big statement that deserves an explanation – let’s start with the main ingredients; the pork content ensures that there is less waste from every animal, the garlic – no contest, Spain produces great garlic – one of the world’s most incredibly versatile ingredients, end of. Smoked pimenton; typical of Spain to have found yet another use for the humble pepper, and who would have thought that smoking it and drying it out slowly then grinding it to a powder would lead to one of the countries biggest exports? A splash of sherry, again, regional and typically Spanish (not every Chorizo has Sherry – some are teetotal…) and last of all, salt – extracted from the depths of clean, crisp Mediterranean waters, provider of that and so much more. That’s it. Dried out, tied into a “U” shape or straight length. Okay, it’s a simplified view, but that is the long and short of it. The amalgamation of those ingredients, regional differences aside, such as chillies, gives an ingredient that is great on it’s own, say as a component of a sandwich, as a tapas, short and sweet, hot, cold or as a seasoning it can absolutely transform a dish by adding an incredible depth of flavour and not just that, it releases its colour too – a warm orangey glow that simply sings of a Spanish sunset.

Which brings us nicely onto oranges, a key flavour running through this simple but beautifully balanced dish. Serves 4.

Ingredients:

4 Chicken breasts, or 8 thighs, skinned.

500ml Chicken stock

1 large or 2 small oranges, preferably Spanish, skinned and segmented, ( reserve 1 dsp of grated skin)

1 Can chopped tomatoes

Kalamata or black olives, stoned (allow around 6-8 per serving)

1 Onion (red or white – up to you) chopped finely

3 garlic cloves, crushed, and chopped very finely

1 (aprox 200-225g) Chorizo, chopped into 1cm slices

1 tsp smoked pimenton/paprika

pinch of chilli powder or flakes

Fresh parsley, chopped for garnish

Olive oil – general use

Black pepper, Sea salt, general use


Green peppered rice – to serve:

1 mug full long grain rice

2 mugs water

1 onion, chopped

1 green pepper, chopped

half tsp turmeric (or use a few saffron strands if you feel flash)

Black pepper (around half tsp)

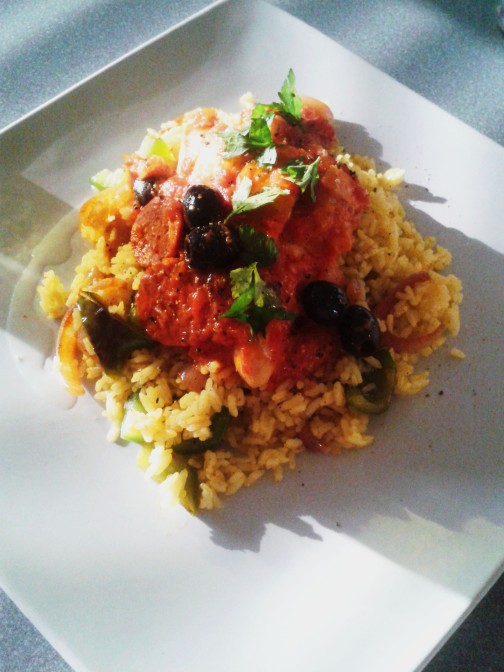
Let’s cook: Firstly, make your tomato sauce – with a good splash of olive oil, gently cook the onions and the garlic together in a large deep casserole with a well fitting lid, and when translucent and soft, add the tomatoes and turn up the heat slightly. (Don’t overheat – tomatoes don’t like boiling and the sweetness will disappear) allow the sauce to reduce down for 10-15 mins then add the chicken, the chorizo, the stock, the chilli, the grated orange rind and the smoked pimenton, stir through and then turn down to a low heat, add the lid and cook for 20 minutes, stirring occasionally.

2014-04-28 18.35.43

Served simply on a bed of my green peppered rice – a lovely dish and all cooked in one pot, too. Serve rustic, or posh up the presentation for a dinner party by separating the rice into a ramekin or small dish and turn out onto the plate. Just add some cool sangria and it’s a job well done!

Meanwhile, in a small frying pan, heat a little oil and cook the onions on a high heat for 4-5 minutes, allowing a little colour to appear on them, set aside and using the same pan, add the green peppers with the black pepper – turn the heat up to medium/high and cook for 2 or 3 minutes, stirring – you want to retain a bit of crunch to the peppers. Set these aside with the onion. Add the orange segments, most of the olives (reserve 2 or 3 as a garnish for each portion) stir through and cook for another 15-20 minutes.

Prepare your rice pan; bring the 2 mugs of water to a boil, add the rice and the turmeric, stir with a fork and cover the pan with a lid. Cook for around 10-14 mins or until all the water has been absorbed by the rice. Stir the onions and peppers through with a fork. Both the rice and the chicken should be ready at around the same time, so serve straight away on top of the rice with some chopped parsley and olives and a twist of black pepper.

Above all, enjoy with thoughts of all the beauty that is Spain along with everything it offers the Mediterranean, Europe and the massive culinary world that lies beyond!


Loukaniko Galette

Recipe category flag logos_7


The humble sausage has had mixed press over the years, and it’s not surprising really when you think that there are ( here come the statistics) around 1500 types of sausage in Germany alone – worldwide, the figure is more like 12-13000 varieties – that’s a lot of intestianal tracts! The UK consumes a staggering 196,000 tons of sausages each year, increasing by a couple of percent annually, and every country takes pride in its own sausage – from Kielbasa in Poland, German Wurst and countless Salami, Chorizo, Garlic, Saucisson and Pepperoni varieties from Italy, Spain, France and spicier, (likely more lamb-based Merquez style) versions in the south of the Mediterranean region, which is where the sausage was born as long ago as 5000 years ago from Sumerian roots – formerly ancient Mesopotamia, in the southern part of Iraq – which eventually worked its way upwards along the Aegean Sea, thanks to the Romans, and was eaten in ancient Greece; hence this recipe, my tribute to a worldwide phenomenon that sees around 87% of the world population regularly eating a sausage of some kind every day.

So here’s my Greek sausage celebration. The Loukaniko is Greece’s most popular sausage and it’s orangey citrus edge is both delectable and unusual. You can use any sausage you wish to, but try to use one with some real flavour and spice – actually you can use any cheese you like alongside the goats cheese. Just make sure it melts well. Strictly speaking this isn’t actually a galette, as they are usually round – Filo (phyilo) pastry is used here, but puff pastry works really well – serve small as part of a meze or serve large with some freshly sauteed potatoes and a fresh Greek salad of tomatoes, red onion, black olives, cucumber and mint leaves, drizzled with olive oil and a splash of white wine vinegar.

Serves 4 as lunch, appetiser or part of a meze:

4 Loukaniko sausages, or similar, cooked, chilled and sliced diagonally into flat slices

1 tbsp Honey, preferably orange blossom

1-2 dsp Wholegrain mustard (to taste)

1-2 dsp Mustard Thessalonique, or Dijon mustard (again, to taste)

1 tsp chilli flakes, or boukovo (dried red pepper flakes)

1 tsp dried oregano

16 cubes Feta cheese

150g cheese such as Graviera, Cheddar, Mozzerella or Jarlsberg

10-12 mushrooms, quartered

2 cloves garlic, crushed into a paste

Few sprigs fresh parsley, chopped – reserve a few whole leaves for garnish

Olive oil, Greek please! general use

1 sheet ready made filo or puff pastry, cut into four quarters, corners removed to make an oval

Let’s cook! get the old oven onto around 200°c and then rub a little olive oil (1-2 dsp) onto a baking sheet large enough to hold your 4 quarters of pastry, (or two smaller baking sheets) spreading it with your fingers to cover the surface. Place your pastry quarters onto the baking sheet and, using a sharp knife, score around the pastry around 15mm in from the outside edge. This is where all the ingredients will go, and the border you have created will rise around it when baked. Set aside and cook your mushrooms in a saucepan on a medium to high heat with a tbsp or two of oil, and when almost cooked, add the garlic and continue to cook for a few more minutes until the garlic is cooked. Take care not to over heat. Add the chopped parsley, stir and then drain in a sieve – mushrooms do yield a good amount of liquid when cooked, so drain for a while and allow to cool otherwise you will end up with a soggy base to the pastry.

Next is to glaze the sausages. Combine the honey, mustards, chilli or pepper flakes and oregano in a suitable bowl and then add the slices of sausage, get your hands in and coat the sausages in the glaze.

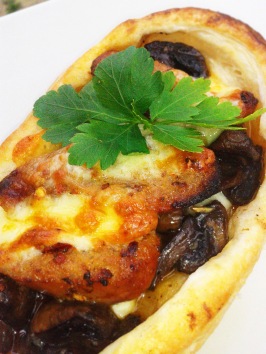
To construct the galette, add a few cubes of feta and the second cheese to each pastry shape, ensuring that the ingredients stay within the scored line you made earlier. Add mushrooms, a little more cheese and then top with the glazed sausages. It may help to squash the cheese and mushrroms very slightly in order to get the sausages to sit on top – hence the long diagonal slicing which helps them to sit flat on top; finally add a couple of small pieces of cheese onto the sausages and bake for 7 minutes in the hottest part of the oven, check and if not quite there, bake for a further minute or two, checking intermitently – filo pastry cooks beautifully but can burn very suddenly so keep an eye out. If using puff pastry, it’s a little more forgiving, but stay alert..

Delicious, whether you go for the puff or the filo version. Nomnom..

The sides of the pastry will rise up the sides – make sure you have cut the sausages into long diagonals or they’ll be difficult to get to stay on!

To serve: a few green leaves, chopped fresh tomatoes (cores removed) and a few freshly sliced red onion rings dressed with oil and white wine vinegar or rice wine vinegar is perfect, or go for the Greek style salad as mentioned in the introduction. Why not try a giant one as a tray bake and slice portions at the table? It will need a little longer to cook, but works well. Wine? well – I discovered a beautiful red recently – Marzemino – it’s Italian, from the Veneto region in the north east and compliments the dish absolutely perfectly with red berry, violet and cherry. Unusual, floral and my new favorite!

Kali orexi!


Yorkshire Puddings

Recipe category flag logosukI know what you must be thinking; there are a million and one recipes for Yorkshire pudding on the interweb, in books and magazines so what on earth is all the fuss about? It’s just a batter; not a very complex one at that. Precisely – it’s so simple, but it remains a black art, and certainly for some unknown reason it can be the make or break of a roast dinner in the UK.

I should just point out a little bit about this humble, puffy delight; Firstly, there is NO definitive recipe. There are many similar ones, but ask ten different people from ten different areas of the UK and I will show you ten different ratios, ten different cooking temperatures and ten different techniques. The Yorkshire pudding has its roots firmly embedded in the north of England, hence the name, and in times gone by, when eggs and milk were plentiful, but meat was not, ‘Yorkies’ were cooked and served before the main part of a meal to fill up the guests so they didn’t use up too much of the meat course that followed. Usually done as one communal pudding that everyone pulled their portion from, this screams of common sense cooking if you ask me. As time went on, the humble Yorkie evolved into single portions, and has even been the vessel in which the main meal is served – sliced beef, roasted potatoes and vegetables smothered in rich onion gravy is one of hundreds of popular fillings and indeed, saves on washing up!

Over the years inventive chefs and humble housewives have added herbs, spices and flavourings to the batter, some with better results than others – even sweet versions are popular and there are restaurants whose menus comprise just Yorkshire puddings with imaginative, sophisticated and perhaps over zealous dishes that actually are so far removed from the original that they cease to be Yorkshire puddings anymore.

However you make yours, they are moreish, light and an obvious omission from a Sunday roast if forgotten! Here’s my recipe, (that’s a million and 2 now) which I have honed and experimented with over several months. All I can say is that it consistently works well for me. Forget all the old tales about chilling the batter, using sparkling water, separating eggs, only using certain oils etcetera, the golden rules are; Hot oven, hot oil, speed and patience… oh, if you can get proper Yorkshire spring water, then that might just help…

Makes around 18 – 24

6 eggs

350ml milk, whole or semi-skimmed will work fine

350g Plain flour

1 dsp Vegetable oil per pudding ( you may need slightly more, depending on the size of the compartments of the tin you are using.)

Around 70ml cool water

Good pinch of salt and pepper

Let’s cook.. First, preheat the oven to 250°c, grab a nice big mixing bowl and put in the flour, crack in the eggs and using a balloon whisk, stir by hand (don’t use a blender – I have tried and for some reason it just doesn’t work so well) until roughly mixed – try and get as many lumps out as possible at this stage, but don’t worry too much – then add the seasoning, water and milk and whisk for at least 3 or 4 minutes, preferably for 5 or 6; ( or, as a head chef once said to me – “until your arm falls off”) until you have a smooth, silky batter mixture, full of little bubbles. Decant the mixture into a jug – one that has a decent pouring lip on it.

Next stage is to heat the tins – I use deep muffin tins with 6 compartments – put 1 dsp per compartment of vegetable oil, sunflower oil or rapeseed oil – any oil that will withstand a high temperature will work well. Olive oil doesn’t tend to work as well, because of it’s low maximum temperature, which is great to minimise the risk of burning garlic and other ingredients, but not for Yorkies.

Obviously, when handling hot oil, please be careful. Make sure that your tins are absolutely dry before adding the oil, otherwise they can spit once hot. Don’t overfill them, and always handle with an appropriate heat proof cloth or gloves.

Put the tins into the oven and heat the oil for 4 or 5 minutes until smoking, then carefully but swiftly remove from the oven onto a heat proof surface – I put down a few old tea towels which protects the work surface and also keeps the heat in the oil a little longer – you need to act quick while the tins are out, so pour a little of the batter into the centre of each compartment to a depth of 10 – 15 mm. As the batter hits the oil, you should hear a sizzle. The longer you take, the smaller the sizzle. Don’t over fill, you will end up with heavy, soggy bottomed puds, drenched in oil. Return the tins to the oven, close the door, reduce the temperature to 200°c and LEAVE IT ALONE for 9 minutes. Don’t open the door, don’t even think about it!

2014-04-05 18.16.55

Simple, light and an absolute must for a roast dinner – the UK’s contribution to European cuisine apart from fish and chips..!

After this time, you will have light, risen, but slightly pale Yorkies. You have done the hardest part.

Reduce the temperature again to 180°c, and continue to cook for another 5 minutes, checking halfway through, or if you have one of those ovens whose temperatures differ from shelf to shelf, just move them to the coolest part, usually the lowest. Remove the trays from the oven and allow them to cool for 5 minutes. If you try to remove them too early, chances are they will tear, and all the hot air which is now drying out the puffed up interior of the pudding will escape. It’s all in the science..

Your Yorkies will weigh very little, with high sides and can be cooked before the rest of your meal so you don’t have to worry about timings. To reheat, spread out onto a baking tray and pop into the oven for just one minute. If you use larger tins, you will use more mixture, and you may need to bake for around 20 -30 minutes – but don’t be put off – you can fill them with bacon, eggs, sausages and beans, meats with or without sauces, vegetables, roasted or char-grilled – the world is your oyster, so let your imagination run wild with your favourite fillings, and let me know how you get on! Enjoy.

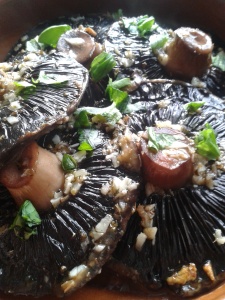


Spiralli Messina

Recipe category flag logos_5

I love Italy. I love the passion that every Italian seems to exude from every pore, regardless of the subject matter. I love the pure pride of the people, the sense of belonging that they naturally have, the architecture, the cars, the scooters, the art, the opera, the vistas, the vast squares edged with bright red parasols over stylish outdoor furniture and of course, the food served by the establishments contained within them, from a simple coffee to a full on evening feast; Italians just have a way about them and it’s not contrived. Italian cooking spans many fabulous ingredients grown in the country and it’s also home to a myriad styles so it’s no wonder that some of the worlds best chefs hail from some of the busiest and most precise kitchens in the country – outside the country is no exception either; from Ticino at the top with its’ crossover recipes, Swiss influence and fabulous lakes to Sicily at the bottom just south west of the tip of the “boot” – a short boat ride away from the mainland. Talking of which, I couldn’t write about Italy without mentioning a fabulous, inspirational blog that I follow which is well worth a look – it’s called ‘Come follow me to Italy’, and it captures some really genuine experiences of Italian cuisine – the sort the Italians themselves tuck into regularly – no pretences, just great food and banter to match. Click here to discover the real Italy

Sicilian food, much like the rest of the Mediterranean regions relies on the produce that surrounds it and therefore makes the very best of these ingredients in a most simple, and usually memorable, way – so there’s lots of seafood, plenty of pasta, some of the loveliest vegetables and most delicious salami money can buy. Here’s a lunchtime nod to that attitude and those great flavours; I don’t want to try and rewrite the recipe book – more open the first page, take it in and put something back in return for the constant inspiration I have happily cooked from over the years – so here’s my Sicilian inspired pasta with a tomato, pea, herb, smoked paprika and salami sauce. Essentially this is a one – pan dish, too so there’s less to wash up as well! Pair this with a white wine for a change – try Thea Bianco. from the Tre Monti winery… most of all, enjoy this very straightforward dish with passion – grande passione, if you will.

400g Spiralli pasta

400g tin chopped tomatoes

1.5 – 2 litres water

Generous pinch sea salt flakes

300g Fresh peas/frozen ok

Pinch chilli flakes/to taste

1tsp Smoked paprika

1tsp herbes de provence

1 Sprig rosemary, finely chopped or half tsp dried rosemary

1 Bay leaf

1 tbsp Tomato puree

1 Clove garlic, peeled, and slightly squashed

Salami, either cubed or sliced into ribbons from slices

Fresh basil leaves, torn, to serve

Pecorino or Parmesan cheese, crumbled, to serve

Extra virgin olive oil and freshly milled black pepper to serve

In a large wide sauté pan, (rather than a saucepan) bring to boil the water into which you have dissolved the sea salt. Add the rosemary and the herbes de provence, then the squashed garlic clove – you will need to remove it later along with the bay leaf – add the pasta and turn the heat down slightly to a rolling boil.

2014-02-26 14.01.43

There’s very little to say here – it’s a great lunch dish – the recipe here serves around 4 or five depending on your appetite. it’s also great chilled and served with a green salad and some cherry tomatoes drizzled with a little white wine vinegar and a tiny hint of sea salt…

Cook the pasta for around 7 or eight minutes until al dente, and the majority of the water has evaporated. Remove the bay leaf and the garlic clove, then stir in the tomatoes and tomato puree. continue to heat through, stirring for a few more minutes, then add the peas and the salami – heat for just a couple of minutes and serve with a generous twist or three of black pepper, a drizzle of good Italian Extra Virgin olive oil and some torn basil leaves.

Aaah…simple and simply divine.. enjoy.

Magdalenas

Spanish europa cuisine flag

These little Spanish cakes are simple to make, and, for me, they sum up not only Valencia, but almost the whole of Spain in a couple of refreshing orangey bites – they are light and laced with an edge which simply screams of groves of citrus fruits, shining in the bright Spanish sunlight, waiting to share their tangy interiors that lay below the waxy porous skins…

Traditionally these cakes are lemon based, but the orange is the heart of Spain, so my version has a definite naranja finish.

Double up with a hefty swig of proper coffee and the world seems to melt away and disappear; just for a while, anyway!

Ingredients: (for 8-10 cakes)

2 Eggs, well beaten

125g cooled melted butter, unsalted

125g Caster sugar

125g plain flour

2 tsp baking powder

Finely grated zest of 1 lemon and half the juice

Finely grated zest of 1 orange and half the juice

1 tbsp whole milk

2013-11-10 13.36.28

So easy to prepare, and even easier to eat – once you taste these, you’ll make them a regular on your baking schedule and you’ll love them forever.

Let’s cook – Preheat your oven to 190°c. Take the beaten egg and sugar and mix together to form a smooth paste, then add the melted cooled butter, a little at a time and combine well – stir in the orange and lemon juice and zests, milk, flour and then add the baking powder, stirring the mixture to ensure all the ingredients are well distributed.

Spoon the mixture into individual paper cases in a bun tin, and bake for 15 minutes when they should be risen, golden and reasonably firm to the touch. Sprinkle with a little caster sugar to finish – if under done, return to the oven for another few minutes then check again. Magdelanas can be served warm with a dab or two of cream, ice cream or a light vanilla custard, or cold – whichever takes your fancy. Another thing you can do is drizzle a little (a teaspoon should do) Cointreau (orange liqueur) over the tops whilst they are still hot, for a lovely warming addition.